
— 2022 —
mina the hollower
theoretical level
Mina the Hollower is a 2D retro Zelda-like that has been recently announced by Yacht Club Games.
I really liked the game so I decided to make a theoretical fan level design, like fan art but for level design.
I specified 'theoretical' because the game is not playable yet, the demo is not released to the general public, and I have no way to test what I have created so far. So this is a theoretical approach to the design.
preproduction
The idea consisted of making a level design
not only with existing features (at least what was revealed!), but to imagine new ones and try to integrate them in Mina's adventure through this level design.
After a little brainstorming I quickly found ideas that came together in interesting ways and that I wanted to explore.
I tried to find gameplay that matched with the lore of the mysterious and spooky isle.
Then, I made a list of the gameplay elements existing in the game, in order to spot which ones could interract in interesting ways with the two systems I had found.
I am very visual so I need to have an easy-reading list.
Nothing beats drawings of real assets!

Then I could note some cool interactions ideas and know what elements to pick for my level.


I also broke down the Crypt's level from the demo. Thanks to that I could learn how it was laid out, and the general level design philosophy.
I also listened to an interview of the director of Mina the Hollower to have an even better insight of the global experience intentions.
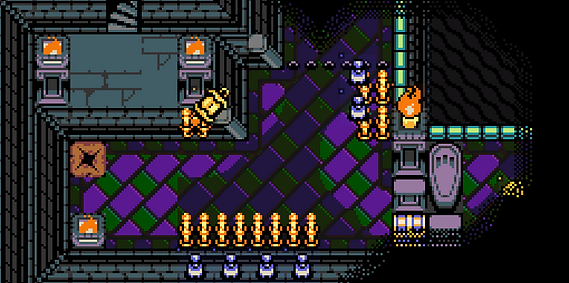
The lore
The action takes place in "The Extinguished Church".
It is a dark structure that used to be illuminated by novena candles.
Recently the church was abandonned for mysterious reasons.
Some stained-glass windows are now broken, so strong gusts are able to disturb the area, blowing out the candles.


mechanics
The core mechanics of this level are the following:
• The lighting system.
Similar to Zelda a Link to the Past, some rooms are submerged into darkness.
However some game elements emit light.
• The wind system.
Like in many games, the wind is a force that pushes players and enemies.
A wind mechanic already exists in the game, as we can see in the trailer:
during a bossfight against the Nox's Beasts, it inhales a lot of air, attracting Mina to his maw.
In this church level though, the mechanic is a draugh within the church, a gust of wind that comes periodically on the whole screen, with some anticipation feedback.
This anticipation feedback is like a tiny gust (with no effect) that shows the wind direction (fixed and proper to each room) and that always appears 1.5 seconds before the real gust.
When the first gust of wind comes after a brief moment in a new room, it blows out candle lights in the open air, like this one →


DESIGN NOTE
I want to use the light's potential more than in A Link to the Past.
So at the beginning, Mina doesn't have any tools to light dark zones of the screen and her navigation relies on the paths that are lit and a bit of memorization.
But as she progresses through the level, she has more and more control over light, and light management becomes part of the gameplay.
global map of the level
The level is 24 scenes wide. I didn't expect to make a level as large as the ones in the game (in average), but I wanted to show all the ideas I had and integrate them smoothely.

2nd Floor
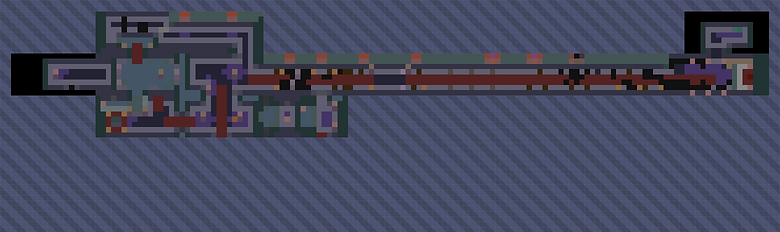
1st Floor

Outside
step by step level design intentions
establishing shot
It's a two screen wide shot where you can see the kind of place you will enter.
There is no music yet, only a
wind ambiance
(introduction of the concept).
The sign near the door says "Please mind to close the door"
A lot of details catches your attention, saying "there are a lot of passages here, maybe secrets".
The skull especially, is usually found in secret areas and is a hint that this passage may be a secret up here.
The player can begin his secrets task list and remind he has things to do and to look for.
Thanks to the yellow bone near the pillar you can deduct easlily that you can pass behind them, and maybe guess that you can follow the path to go around the church.

←1
2→
↑3
←
←1
Let's go to the left
←
It's just a teaser for future areas, but
it allows us to build a better mental map of the place: "Ok there is a door on the left of the church".
I reward the player's curiosity with 20 bones.
Now let's check to the right
2→

→
This is kind of the same as before, but it seems to be a later continuation of the future main path of the level. I give players the information that a key is needed to continue here (mental map building continuation).
↑3
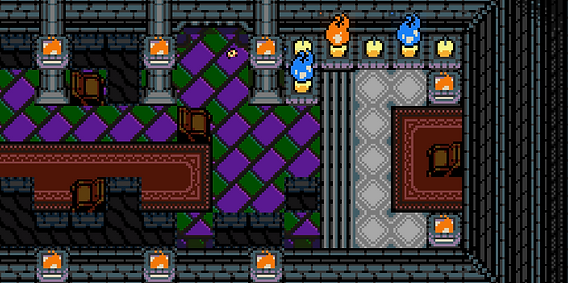
And finally let's get into the church

Wind direction: ↓
←
←2
↑1
You enter this dark place, and after a few seconds in it, a gust of wind pushes you back and blows out the left candle (introduction of the concept).
The other one is protected and still lights the room.
The entrance also slightly lights the room.


←
←2
↑1
Here is what the room looks like after the candle blew out.
The Gooper (name of the enemy) is placed here to temporize, to prevent the player to rush into the Hollower's Underlab or to another room, squandering the first gust of wind.
To prevent this furthermore, a triggerbox is placed on the top and the left of the room to force the gust if it still has not occured.
For the rest of the page I will show images in this "debug" middle opacity state, where you can both imagine the room when it is dark and at the same time figure out what is underneath the darkness.
DESIGN NOTE
I know that during the development, fire used to have a black stroke. It was removed and that feels like a good decision because it better marks the break between the basic tiles and a gameplay/ a more important element.
This is why on the protected lights, fire has no strokes. It has no interaction with anything. But this is not the same for candles, as they are real gameplay entities.
↑1
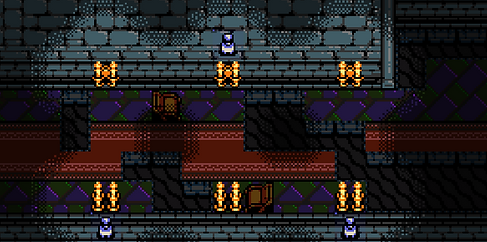
We will see later what is the room on the left, for now let's follow the main path

We slowly push the wind and light concepts further:
Now there are 3 Goopers that are easy to fight but after a few seconds a gust blows out the middle light.
The first Gooper (on the left) is placed to be the first one fought, and temporize a bit for the first gust to come.
So when the candle blows out, the player can realize "oh no! I saw a monster upwards but now it's somewhere in the dark!"
The player can begin to feel the importance of the light during fights.
The wind pushes players towards the "safe zone", where the protected candle is still illuminating the area. They can stay here trying to hit monsters that are in the dark to locate them.
There is an (optionnal) new mechanic here: the Throwable Lantern. It works like a rock: Mina can go underneath to grab it, hold it, and throw it to enemies. And it emits light! Thanks to this mechanic Mina has a bit more control over the darkness.
• If the lantern is thrown at an enemy it is destroyed.
• But if the lantern is thrown at a wall or to the ground, it remains still intact and stays there.

When enemies take damage, the feedback is visible above the layer of darkness, in order to tell the player if they have hit something or not.
Wind direction: ←
←
↑
↑
We will see later what is the room on the right, let's continue ahead again
No Wind

←
←
In previous rooms you could fight what was in the dark while keeping a safe distance, staying in the lit zones.
I want to push players outside of their comfort zone and go forward.
The Sparkmancer here pushes the player to do so, in three different ways:
- Killing quickly the Goopers and rushing into the Sparkmancer
- Using a sidearm
- Hollowing through the ground to bypass the Goopers
I want to highlight the last solution because I would like the player to realize at some point that "even if there is dangerous darkness in front of me, I still can hollow into the ground to pass through the danger part safely". This is the reason why there are some inviting bones just after the darkness.
I must mention that the first Gooper is intentionnally really exposed, inviting the player to kill it, but the sparkmancer is here to revive it. So if the players had not realized the Sparkmancer's presence, now they know.
Note: I want the player to focus on the situation described above, and in the church's layout it makes sense not to have gusts of wind passing by this part of the church. So there is no wind in this room and the two candles don't blow out at any moment.

←
For the second part of the room, I want to insist on the throwable lanterns. So I blocked the passage to at least force the player to go underneath.
For people that have still not understood the lanterns can be grabbed, there are a lot of bones into the ground to make a hint and improve the chances of discovering it by accident. Furthermore, the next section is completely in the dark and has holes in it. At this point this is a great reason to think "Oh, I need light" and figure out that there is a stock of throwable lanterns waiting to be grabbed.
↓
Let's go down
Wind direction: ←


←
This room is a peak of tension, before the end of the first "chapter".
It is still possible to skip if players really want to but they cannot be sure where the exit is. There is no carpet on the exit path to not give players hints or just the idea of fleeing the fight. Of course this section needs playtests in order to see what players are doing and if some are fleeing in a deceiving non-fun way.
The Skullker is placed in a way that players cannot position themselves comfortably, because the lanterns are blocking the way and prevent them from having the enemies in the axis of fire.
Thanks to this, on approach is more suggested than any other, so players are really free and pushed to find their tactics by themselves.
Mind also that the wind will periodically blow, pushing all characters, and blowing out the candle. Most of the room's lighting will only rely on Mina, with her lantern management.
But thankfully, there are a lot of them.
↓
Let's go down
←
No Wind

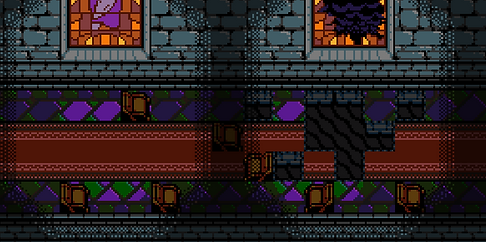
This room concludes the chapter. you cannot do anything here for now other than taking the stairs.
This is not useless though. It allows players to really see the green candle and add it to their future-things-to-consider list.
You can see here that this room is connected to the entrance. Players could have visited this room before, it would have reinfoced this "green candle future objective".


One other thing to mention:
As you can see above, breakable candles emit light!
They are not affected by wind, but as soon as the players breaks them to get the loot, they naturally stop lighting.
So this can lead to interesting risk and reward dilemmas.
For now, they are placed in restrooms with a lot of light, but the concept will be pushed further later.
↑
Let's take the stairs
←
No Wind


This one is the true rest room and reward room that comes after the tension peak.
The first breakable candle gives the Lantern Sidearm, that I noticed in a few frames of the trailer.
I guess the pickup asset should be yellow because I realized that the sidearm pickups only have 4 colors like most of the assets, and also this is how it is interpretated in the 'inventory' slot.
Here players are locked in this room until they have understood that they can light the candle on the right with the sidearm.
In order to avoid any possible softlock, I give them a mana pickup in every breakable candle in the room. It is also a big hint that says "Use your new sidearm!"
If they miss every shot and run out of ammos they can still go back into the underlab and all the pickups will respawn.
I don't know yet if there are not too many mana pickups, and if the player cannot just farm pickups endlessly.
When the candle is lit, the spike barrier gets down, and the candle allows you to see the previously hidden chest.
It contains a Lighting Trinket, that brings a constant little glow around her. (in the player's head: "FINALLY!")
The objective is not to give a big light boost but to see where you are walking and what's right next to you.
So the glow is not that large, but one really interesting advantage is that it still glows when Mina is underground. I made this choice because I don't want players to be afraid of hollowing if they loose their light while doing so. Hollowing is the core gameplay and USP of the game so it deserves to be put forward.
I don't know yet what the trinket item would be, of course I thought about being a lantern trinket but there will be too many different lanterns doing different things in the game, it can be too confusing. I haven't found yet one thing that could be as affordant as a lantern and that fits in the level theme.
(Spirit candle?)

←
Of course, the Underlab is on the right spot to equip this new trinket before continuing.
Notice that you cannot go back to the stairs for now; you must have done the 2nd floor section before. Otherwise, you would be able to cheese the whole floor, thanks to the lighting rewards.
↑
Let's continue to the way up
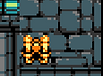
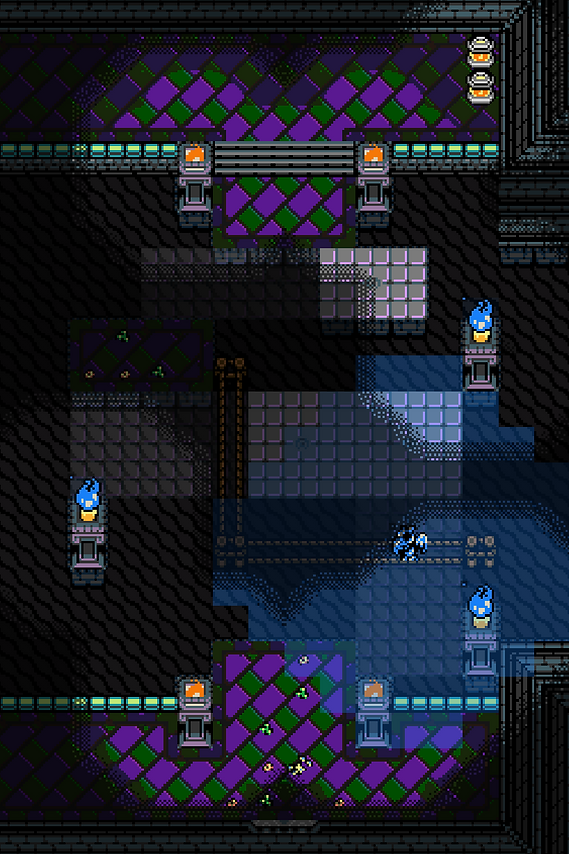
This next room is the first introduction to a new enemy: the Blue Wisp.

Wind blows

The concept was teased /explained by the candles we've seen before:

But when the wind blows, instead of blowing out, the Blue Wisp is detached from its candle and becomes an enemy that wanders around and attacks sometimes.
And of course, it still sheds light! Until it is killed.
This is why this enemy is interesting: the player will have to set his fighting priorities in order to kill him last, fleeing its attacks, because it offers a great luminosity advantage while it is alive.
Wind direction: ←

←
←
The Gooper and the bones are placed here to temporize, grab players' attention, and keep them on the right side of the screen before the first gust comes.
The wind will detach the Blue Wisp from its base and move it towards the center of the room.
Therefore, the "Red Digger" (I couldn't find its real name!) will be visible.
I want players to begin realizing that the Blue Wisp is a precious advantage to see other enemies' location. (and later, to see that killing it has a cost.)
The lanterns can be used to help with the light here but also be grabbed for the next room.
↑
Let's continue to the way up
Precisely, this is the room where I insist on the fact that killing Blue Wisps has a cost.
I call this room the "Gold Rush" or the "Hide and seek".
It feels like it's almost a mini-game where Red Diggers are trying to hide and get Mina, Blue Wisps helps with the hunt but they are attacking some times, and there are a lot of hidden and tricky bones to find.
There are a lot of opportunities and reasons to hollow in this room.
If it's not already the case, players are really pushed to understand here that they can avoid to be pushed by the wind if they hollow into the ground.
Wind direction: ←

→
←
→
Let's continue to the right
Wind direction: ←
→
←1
↓2
This is the peak of tension of the second floor. This one relies more on platforming than combat, compared to the other. But is still challenging. Actually this is the room where the wind will be the most challenging, because it is combined with moving platforms and tensioned ropes partially in the dark, Blue Wisps that help with lighting but also sometimes attack, and in the end a Brittle Beak.
I don't know if the Brittle Beak's wake up trigger is set manually in the levels or not, but I highlighted the zone where I want it to wake up if the player comes in.
There are two lanterns to offer the possible strategy of keeping a lantern while avoiding attacks.
When players reach the safe ground on the bottom of the screen, I reward them with bones, that are also here to highlight the discreet exit [ ↓2 ].
But curious and explorator players will want to know where the left path leads
[ ←1 ]...
NOTE
This whole church level is not among the first zones in the game, so the player should have taken the controller in hands. The wind mechanic, here to spice things up and challenge them a little more.
1←
What is on the left?
... And maybe some players remember that there were a bonestone chip to get there.
But that's not all; while you get the bonestone chip you can notice the little exit on the wall.

←
←
↓
Let's get into it

←

Here is where Mina arrives!
This is not only a little passage, but also a first reminder of an entrance that seems important, but that has still not been visited yet.
Considering the time you've spent on the level and all the rooms you visited, you should probably think that this entrance may be reachable soon by now, and that it could be good to keep it in mind.

←

In this shot you now understand the importance of the entrance you just saw. It is leading to a key, and you have to find this entrance from the interior, on the left of the church.
There is a bone reward for your exploration, suggesting that someone was killed here...
Ok, now let's get back into the church again...

...and take the main exit
↓

←
So Mina arrives here.
If the previous secret zone that I just talked about has been missed, here is a big catch up chance:
You have already visited the left area, where you came from, and the path that you are taking seem to transition to the next section of the level (to the left). It is a great indicator that the crane would be something you left behind, instead of beeing a future secret. So it has a great chance of triggering players thought "Oh, I missed something behind"
But don't worry, it is no a big deal if the player skips the previous secret.
Now that most of the players are told where the key is, the puzzle piece that comes next is presented. With the main entrance, these are the only two doors that have a carpet "of importance", to enhance the fact that it is the main path, it is where to go.

→

←
Let's get back into the church by this wall
↑
No Wind

This is just a transition to floor 1.
Nothing more.
But.
Why is the wall not symmetrical.
Have any doubt? Maybe you should at least inspect it.


If you approach you can see the crack on the wall that confims your suspicions.
There is also another hint: the floor tiles that border the walls are not matching the real walls.

←
The room that appears is not lit, so you can discover the surprise by yourself. Like unboxing a present.
What is in the chest?
Probably a trinket; but I don't know, it depends on the needs of the game and the macro progression at this moment; it has no need to be really correlated to this specific level.
Let's take the stairs to the 1st floor
↑
Wind direction: ←

←
←
It is the transition follow up, and it reinforces the fact that the second entrance is the main path. You can understand a bit better where the level continues and note it in your mental map.
Let's go to the left
←
This is the main entrance.
I want the player to remember:
"Oh, it's a good timing, I think this room on the left was not finished"
Because the player surely went into the Underlab since the beginning, the candle light might have respawn, showing the no-so-discreet path.
Because the player knows the place, this path is more likely to be the new focus of the player.
Plus, it is the path straightforward. You come from the right, towards the left.
(If some player had rushed without going into the underlab it's fine anyway: because players now have light, they will be more interested in discovering areas that were too dark before, and this area without light is looking particularly inexplored because at this stage it's the only path that is a bit hidden.)
Wind direction: ↓

←
←
Let's go to the left again
←
No Wind
You are remembered of the existence of the mysterious green candle.
But more interesting, you see that you have the lantern sidearm and that you are now able to open the spike fence.
If you are out of ammo, you can still break some of the foor candles to find enough mana.
←

Once the candle is lit, it reveals a carpet, leading to a 'secret' passage!
Of course you can also find it by exploring the dark with your lighting trinket.
Let's go into it
↑
No Wind

←
←

Wind direction: ←

←
←
Wind direction: ←

←
←
I call this room "The Dark Maze".
Actually, you could find this room by accident at the beginning of the level. But if the rare case happen I want to totally prevent players from going any further without light. (except speedrunners that knows the game by heart)
So players must have at least one of the two lighting item in order to pass through (lighting trinket strongly recommended of course, there is still no reason to unequip it at this point of the level)
I also placed a very large gap between the start and the exit, because I have taken into account the possibility that players may have equipped the Spider or the Ferrying Wisp trinkets, that allows to cross vast gaps.
Because the room is almost completely dark and you can still see there is void, it's a way of saying: "If you don't have any light item, come back later!"
This is where the path transitions.
There is still wind in order to be coherent, because the draught is circulating between all the entrances.
Let's go outside!
↓

Finally this place!
And finally you can grab the key, with a bit of challenge.
Note that if players have already fought the Brittle Beak, and that they have not gone into the Underlab since they returned to the first floor, it is not here and the battle is much easier.
It's an invisible way of rewarding people who took that risk (conscientiously or not).

Here is the trigger box I would-like to have for the Brittle Beak to wake up. I want it to sleep while Mina is still on the first tiles of the screen. This way players are not lunged as soon as they arrive.
I think I will replace the coffin by a thing you can jump over, so that players have not to backtrack into the church in order to get to the locked keyblock.

←
←

→


→
←

←
←
Go to the church's nave
↑
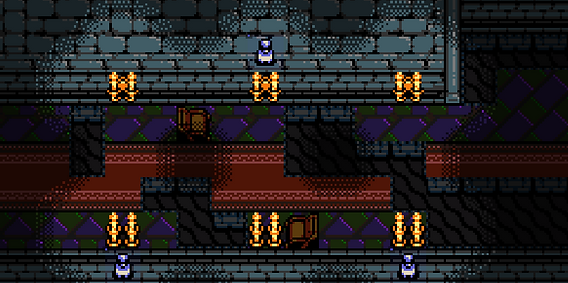
The next 5 rooms are the long church's nave crossing.
This may sound like a lot of rooms but they are very straightforward. The goal is not to have very interesting rooms dense of rich ideas, but to pass little challenges one after the other. We will talk about this later.
Wind direction: ←

←
→
The first one is just the beginning.
I put coffins so it is impossible to cross the gap, because the room is linked to the start of the level.


Continue
→
Wind direction: ←

→
Little challenge #1:
Spike Roll + Dark + Wind.
You don't see the Spike Roll when it's rolling, there is light only to show it when it's still.
DESIGN NOTE
Notice that for a good screen transition, the chairs on the borders of the screen always match with the adjacent screen.


Continue
→
Wind direction: ←

→
Little challenge #2:
A little hide and seek, zone by zone.
The breakable candles start to put forward a better risk & reward dilemma; they set the stage for an upcoming room.
As you progress in the nave, the stainned glasses become more important. This one is 3 tiles wide.
Continue
→
Wind direction: ←

→
There is a little platforming challenge between the holes and the chairs, but the point of this room is narrative:
It's the environmental narration room.
The church has suffered from a massive impact, that broke the floor and the stained glass window partially. Since then, the draught has settled down here, blowing out the candles.
This is because of this event that the church has been abandonned and renamed "The Extinguished Church."
The chairs, that used to be a bit aligned in the previous rooms, are now a total disarray from this point.
Continue
→
Wind direction: →
→
This is the room pushing the risk and reward further. This is one of the rare rooms that does not have any light if all the candles are broken.
Note that the wind still blows and spices up the platforming challenge.
By the way, because the wind comes from the last broken window, the wind direction has changed.
Note also that the floor is still very damaged for this section of the nave, and chairs are still in a mess
Continue to the sanctuary
→
←
Wind direction: →
This is (almost) the church's last room. The thing that caused massive damage seemed to have walked from the window to this room.
The little bone is here to catch a bit more player's attention to the passage.
Go under the wall
↑
No Wind

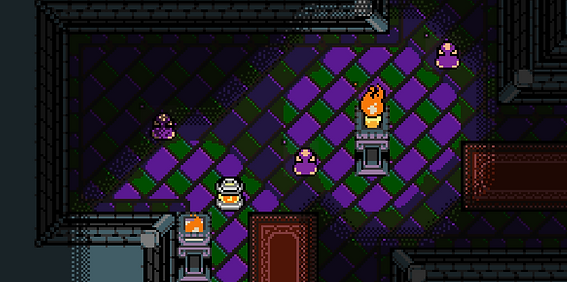
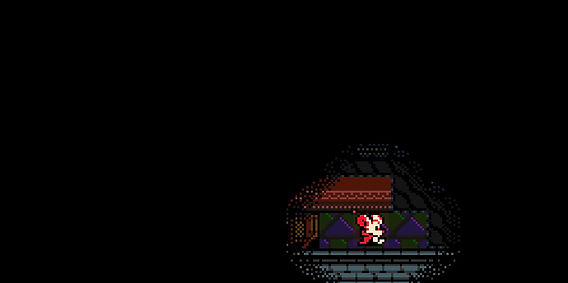
This is the hide for the NPC Father-o'-the-Wisp.
He used to light the whole church, staying on his green candle, before the accident occured.
He fears the wind, and now that it is present in most of the church's rooms, he is forced to hide here.
This situation is explained in a dialogue with the player. At the end, Father-o'-the-Wisp will ask Mina if she can help, and will follow her.
escorting father-o'-the-wisp to the green candle
• Father-o'-the-Wisp will follow Mina as long as he is protected from the wind.
• If he is vulnerable for the whole duration of a gust, he rushes at the beginning, into his hide.
• He sheds a large aura of light.
• To protect him from a gust of wind, Mina must be hollowing into the ground when the gust comes. Remind that the gusts always have an anticipation before occuring. When Mina jumps to hollow, Father-o'-the-Wisp is automatically 'taken with her' and no longer lights the room while they are underground.
In the first room, you are given enough space to move easily and hollow where and when you want.
The chair in the middle of the screen forces players to go around it.
It serves as temporizing players' movement, so that they do not skip the gust.
If a player has not read the dialogues or have not understood yet that they have to avoid the wind, I want them to figure it out in this room, or at the latest in the next one.
When the gust accurs and if Father-o'-the-Wisp is not protected, there is a big animation feedback:
he seems to fade away and to be frightened.
Well then, we broke all our lights here?
Thankfully, Father-o'-the-Wisp is sheding a lot of light; but this is the room where you learn that when you hollow, he is not lighting the way anymore.
Another thing here: A lot of jumping is involved in order to progress, and when you are jumping, you are not hollowing (yet).
In these next rooms I challenge players on the timing of their actions, because they have to be ready to hollow as soon as they see and ear the gust anticipation.
The first time you crossed that nave, there were enemies coming at you, but if you killed them all, they are not here anymore. The backtracking is more focused on platforming and timing now.
Wind direction: →

←
Wind direction: →
←
Wind direction: ←
←
Wind direction: ←

←
Wind direction: ←

←
Wind direction: ←

←
Wind direction: ↓

←
Wind direction: ↓

←
No Wind

As soon as Father-o'-the-Wisp comes back to his green candle, here comes the end of the church level!
Actually I don't really know yet how to conclude it because it depends on the lore and the needs of the game on a more macro level:
In the lore of the game, the Tenebrous Isle on which the game happens used to be lit by spark technology, but the sparks have gone out of the generators. Mina will investigate to bring back light to every island's biomes, thanks to the sparks, once they are placed again in the generators.
I assume here that the extinguished church was a bit more primitively auto-sufficient in terms of lighting; but it wasn't enough to guarantee its prosperity.
The puzzle pieces I miss to conclude the lore of this level are: what happens exactly each time a place is restored, when all the generators are restored, and what are the motivations of the "creeping evil" that surely have unlit the cities.
As the game is still in development and under suspense, the mystery remains!
global map of the level
2nd Floor
1st Floor
Outside
some takeways to improve this level
- In the beginning there are too many "false secrets" that tease next areas but they are not enough rewarding and unique.
- Put more breakable walls.
- Reward more secrets by bonestone chips.
- Test it and better consider the pickup management. Calculate the amount of bones in the level and its impact on the macro game economy and progression.
- Test and see where players need health. Ajust flowers, bushes, easy enemies and other ways to recover health.
- Use more the wind to push the player forward instead of backwards, and make it part of the platforming flow. But actually the wind blows periodically and not at a fast pace, so maybe it would be difficult in this level to provide a flowy wind experience like in Celeste...
→ Add a secret room that is very visible but that has a too large gap to be crossed. The way to reach it, is to equip the Spider and the Ferrying Wisp trinkets, and to benefit from a gust of wind. This would probably be the largest gap you would ever cross in the game (I can't be sure because I don't know every mechanic in the game), so this secret is very optional and sounds a bit like an achievement.
- Find a better color palette, more unique to this environment and more pleasing to the eye.
I reused a lot of assets to reduce the scope, instead of adapting them for this level. Many assets should have their variant for this level, for example the green fences.